


Rooting a Kindle Fire HD or Kindle Fire 2 was already out for a period of time for the users running on Windows, but what about people running on Mac and Linux. We have seen whenever it was time for iOS jailbreak release it used to first appear on Mac and then people waited for Windows. iOS occupy huge market area and that's why the demand for Windows is always there.
What about the people having Kindle Fire HD or Kindle Fire 2 who want to get rooted on Mac/Linux. Recently an XDA-Developer Senior Member prokennexusa has written for people on Mac/Linux which have been tested with Ubuntu and Mac OS X 10.5.8
Before proceeding with Rooting process please check these conditions and proceed otherwise you may brick your device.
1. Software: Linux (tested on Ubuntu Linux, Lucid Lynx) or Mac OS X 10.5.8 or later (x86 only).
2. Hardware: Free USB 2.0 or Greater Port.
3. Software: Linux GNU C Library (glibc) 2.7 or later is required, On Ubuntu Linux, version 8.04 or later is required, 64-bit distributions must be capable of running 32-bit applications
4. Hardware: Kindle Fire HD 7" or Kindle Fire 2 7".
Follow These Steps Carefully:-
- Unplug the Kindle from USB. Go to your Kindle, navigate to the pull down options bar, choose More > Security
- Be sure to Enable ADB by clicking On
- Go to your Kindle, navigate to the pull down options bar, choose More > Device
- Be sure to Allow Installation of Applications by clicking On
Root Kindle Fire HD
Step 1.1: Go to your Mac or Linux workstation, download and unzip Root MANY ANDROID!. Pay close attention to the path where you unzipped Root_with_Restore_by_Bin4ry_v17.
Step 2: Reboot.,After reboot is completed, plug the Kindle into the free USB 2.0 Port. Wait for the driver to install about 2 minutes. Mac OS X and Linux do not require any drivers, the default driver built into these platforms will be sufficient.
Step 3: Open up the Android SDK GUI, click Update as needed so the SDK is running the latest version.
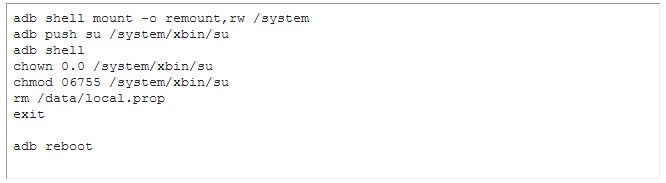
Step 4: Open up a Terminal, at the Terminal window ($ command prompt) type:
Code:
| Click to zoom |
Step 5: Download Superuser-3.1.3-arm-signed.
Step 6: Unzip Superuser-3.1.3-arm-signed.zip to Superuser-3.1.3-arm-signed.
Step 7: Copy the entire contents of Superuser-3.1.3-arm-signed to /Android/android-sdk/platform-tools/ (Step 1 install path).
Step 7.1: Next go back to the open command prompt, at the /Root_with_Restore_by_Bin4ry_v17/# enter:
Code:
| Click To Zoom |
Choose option 1, Run Normal Method and ignore errors. Be careful now and pay attention, you will need to answer "Restore" a dialogue box on the Kindle. Click on Restore. When the program has completed, the Kindle will Reboot.
The forum notes can be found here: Root MANY ANDROID! Forum.
Step 7.2: When the Kindle reboots it will react very slowly, this is normal - leave it alone. Immediately proceed to Step 8 & make sure the Kindle is still plugged into USB.
Step 8: Next go back to the open command prompt, at the /Android/android-sdk/platform-tools/# enter
Code:
 |
| Click To Zoom |
Step 9: After the Kindle Reboots, wait 2 minutes, then go back to the open command prompt, at the /Android/android-sdk/platform-tools/# enter:
Code:
 |
| Click To Zoom |
Step 10: After the Kindle Reboots, wait 2 minutes, then go back to the open command prompt, at the /Android/android-sdk/platform-tools/# enter:
Code:
 |
| Click To Zoom |
Step 11: After the Kindle Reboots, wait 2 minutes, then go back to the open command prompt, at the /Android/android-sdk/platform-tools/# enter:
Code:
| Click To Zoom |
Step 12: After the Kindle Reboots, wait 2 minutes, then go back to the open command prompt, at the /Android/android-sdk/platform-tools/# enter:
Code:
| Click To Zoom |
Step 13: Finally go back to the Kindle, navigate to the /Apps tab, click on Device, next find and click on Superuser.apk initialize the Superuser daemon.
Step 14: Finally, using Silk, Opera, Mozilla or Dolphin Download suchecker.apk: https://dl.dropbox.com/u/54456659/suchecker.apk. After the download has completed, choose Open, then Install to install the apk.
Step 15: When the install has finished, go to your Apps. Launch Root Checker Basic When you check Root you will be presented with a "Allow" dialog box, be sure to Allow Root Checker. You should now see that Superuser.apk is working.
You should now have root AND if this is true your ADB communication is also functional!
Finally, let's disable the Amazon OTA (Over The Air) Updates so your hard work is not destroyed.
OTA Step 1: Delete or move /system/ect/security/otacerts.zip to /sdcard/download.
OTA Step 2: Reboot the Kindle.
Note: You do not loose functionality and you may still install the updates manually after you have read the install notes and know what to expect. The updates and manual install instructions can be found on Amazon Support here.
Attached Files:
Source: XDA-Developers


2 comments:
when I get to the password part on the terminal it says it does't recognize my password! Please help me.
suchecker.apk link is broken
Post a Comment