Hackinthus: mac

Lava Launched Xolo X1000 In Goa Teasing "Fastest SmartPhone"


Lava Xolo X1000!!


Katrina Kaif Launches Sony Xperia Z Smartphone And Tablets


Sony Xperia Z


Samsung Galaxy S4 : Event Round Up, Specs, Pricing and Availability

Samsung Galaxy S4.

Nokia Lumia 620 Review

Nokia's most affordable Windows Phone 8 device, Nokia Lumia 620

Install Instagram Unofficially On Blackberry Z10

How To Install Instagram Unofficially On Blackberry Z10 [Video] !!

Showing posts with label mac. Show all posts

Saturday, January 12, 2013

Kingston 512 GB & 1 TB USB Flash Drives

Kingston, famous for flash-based products, launched world's first biggest capacity USB 3.0 flash drives - Kingston Data Traveler HyperX Predator 3.0 at CES '13. 


Kingston DataTraveler HyperX Predator 3.0 will be available in two variants - 512 GB & 1 TB.
Not only they are huge in capacity, but also fast with USB 3.0 providing speed upto 240 MB/sec read and 160 MB/sec write.
  

Andrew Ewing, Flash Memory Business Manager at Kingston, said 
"Our new DataTraveler HyperX Predator 3.0 allows users to store their entire digital world on a portable USB 3.0 Flash drive. The large capacity and fast USB 3.0 transfer speeds allow users to save time as they can access, edit and transfer applications or files such as HD movies directly from the drive without any performance lag,"
The 512GB variant of DataTraveler HyperX Predator 3.0 is now available online for around $800 - $900 while the 1TB variant will be out in the market this quarter.

OS compatible : Microsoft Windows XP, Vista, 7, 8
                          Mac OS X 10.6+
                          Linux 2.6+


You can also like us on Facebook or follow us on Twitter.


Saturday, January 05, 2013

How To Root Kindle Fire HD or 2 On Mac/Linux OS


Rooting a Kindle Fire HD or Kindle Fire 2 was already out for a period of time for the users running on Windows, but what about people running on Mac and Linux. We have seen whenever it was time for iOS jailbreak release it used to first appear on Mac and then people waited for Windows. iOS occupy huge market area and that's why the demand for Windows is always there.

What about the people having Kindle Fire HD or Kindle Fire 2 who want to get rooted on Mac/Linux. Recently an XDA-Developer Senior Member prokennexusa has written for people on Mac/Linux which have been tested with Ubuntu and Mac OS X 10.5.8

Before proceeding with Rooting process please check these conditions and proceed otherwise you may brick your device.


1. Software: Linux (tested on Ubuntu Linux, Lucid Lynx) or Mac OS X 10.5.8 or later (x86 only).

2. Hardware: Free USB 2.0 or Greater Port.

3. Software: Linux GNU C Library (glibc) 2.7 or later is required, On Ubuntu Linux, version 8.04 or later is required, 64-bit distributions must be capable of running 32-bit applications

4. Hardware: Kindle Fire HD 7" or Kindle Fire 2 7".


Follow These Steps Carefully:-

  • Unplug the Kindle from USB. Go to your Kindle, navigate to the pull down options bar, choose More > Security
  • Be sure to Enable ADB by clicking On
  • Go to your Kindle, navigate to the pull down options bar, choose More > Device
  • Be sure to Allow Installation of Applications by clicking On

Root Kindle Fire HD 

Step 1: Go to your Mac or Linux workstation, download and install the Android SDK paying close attention to the install path. - Mac OS X/Linux 

Step 1.1: Go to your Mac or Linux workstation, download and unzip Root MANY ANDROID!. Pay close attention to the path where you unzipped Root_with_Restore_by_Bin4ry_v17.


 Step 2: Reboot.,After reboot is completed, plug the Kindle into the free USB 2.0 Port. Wait for the driver to install about 2 minutes. Mac OS X and Linux do not require any drivers, the default driver built into these platforms will be sufficient.

Step 3: Open up the Android SDK GUI, click Update as needed so the SDK is running the latest version.

Step 4: Open up a Terminal, at the Terminal window ($ command prompt) type:

Code:
Click to zoom
Now, enter your Root Password if requested to do so. You should now see a # at the command prompt.

Step 5: Download Superuser-3.1.3-arm-signed.

Step 6: Unzip Superuser-3.1.3-arm-signed.zip to Superuser-3.1.3-arm-signed.

Step 7: Copy the entire contents of Superuser-3.1.3-arm-signed to /Android/android-sdk/platform-tools/ (Step 1 install path).

Step 7.1: Next go back to the open command prompt, at the /Root_with_Restore_by_Bin4ry_v17/#  enter:

Code:
Click To Zoom

Choose option 1, Run Normal Method and ignore errors. Be careful now and pay attention, you will need to answer "Restore" a dialogue box on the Kindle. Click on Restore. When the program has completed, the Kindle will Reboot.

The forum notes can be found here: Root MANY ANDROID! Forum.


 Step 7.2: When the Kindle reboots it will react very slowly, this is normal - leave it alone. Immediately proceed to Step 8 & make sure the Kindle is still plugged into USB.

Step 8: Next go back to the open command prompt, at the /Android/android-sdk/platform-tools/# enter

Code:
Click To Zoom
 Step 9: After the Kindle Reboots, wait 2 minutes, then go back to the open command prompt, at the /Android/android-sdk/platform-tools/# enter:

Code:
Click To Zoom

Step 10: After the Kindle Reboots, wait 2 minutes, then go back to the open command prompt, at the /Android/android-sdk/platform-tools/# enter:

Code:
Click To Zoom

Step 11: After the Kindle Reboots, wait 2 minutes, then go back to the open command prompt, at the /Android/android-sdk/platform-tools/# enter:

Code:
Click To Zoom

Step 12: After the Kindle Reboots, wait 2 minutes, then go back to the open command prompt, at the /Android/android-sdk/platform-tools/# enter:

Code:
Click To Zoom

Step 13: Finally go back to the Kindle, navigate to the /Apps tab, click on Device, next find and click on Superuser.apk initialize the Superuser daemon.

Step 14: Finally, using Silk, Opera, Mozilla or Dolphin Download suchecker.apk: https://dl.dropbox.com/u/54456659/suchecker.apk. After the download has completed, choose Open, then Install to install the apk.

Step 15: When the install has finished, go to your Apps. Launch Root Checker Basic When you check Root you will be presented with a "Allow" dialog box, be sure to Allow Root Checker. You should now see that Superuser.apk is working.

You should now have root AND if this is true your ADB communication is also functional!

Finally, let's disable the Amazon OTA (Over The Air) Updates so your hard work is not destroyed.

OTA Step 1: Delete or move /system/ect/security/otacerts.zip to /sdcard/download.

OTA Step 2: Reboot the Kindle.

Note: You do not loose functionality and you may still install the updates manually after you have read the install notes and know what to expect. The updates and manual install instructions can be found on Amazon Support here.

Attached Files:


You can also like us on Facebook or follow us on Twitter.

Source: XDA-Developers

Friday, November 30, 2012

iTunes 11 For Windows And Mac Available For Download Now!

By Harsh Vardhan (Facebook) (Twitter)

Apple today however pushed a newer version of iTunes called the version 11. However we much thought that it would appear with the launch of iPhone 5 or the iPad Mini but never less this updated version appeared now. I m pretty sure you might be knowing what iTunes is :) Officially any transfer of media between your i Devices you need an iTunes.


Although the rise and rise of the iPod, then iPhone, then iPad has seen iTunes downloaded hundreds of millions of times, it has struggled to shake off its label as a slow, resource-hog of an app, and with a big update now upon us, it looks as though Apple has gone some way into fixing up its 10+ year old jukebox.

The new look comprises of improved support for iCloud, the all-new unobtrusive mini-player with quick access to music controls and a much more simpler and revamped UI.


If you wish to grab the very latest iTunes update, you can do so right now by heading over to Apple’s official site for iTunes. Alternatively, you can go down the Software Update within iTunes, which is the preferred option for the vast majority.

You can like us on Facebook or follow us on Twitter.

Tuesday, November 27, 2012

USB Tethering on a Mac

By-Rustam Ali

USB and WiFi tethering has been common to Android running devices, tethering is a process of using a mobile internet data on another device by connecting it via USB or by creating a WiFi hot-spot. MAC users were devoid of USB tethering but now developers have created an application using which they can also access this feature on their MAC running devices.

  HoRNDIS (pronounce: “horrendous”) is a driver for Mac OS X that allows you to use your Android phone's native USB tethering mode to get Internet access. It is known to work with Mac OS X versions 10.6.8 (Snow Leopard) through 10.8.2 (Mountain Lion), and has been tested mostly on Galaxy Nexuses running Jelly Bean. This application is easy to setup on your computer and use.


Installing procedure of HoRNDIS :


-Download the latest binary package, and double-click on it in your Downloads folder. Follow the instructions in the installer.
-Assuming that the installation proceeds without errors, after it completes, connect your phone to your Mac by USB.
-Enter the settings menu on your phone.
-In the connections section, below Wi-Fi and Bluetooth, select “More…”.
-Select “Tethering & portable hotspot”.
-Check the “USB tethering” box. It should flash once, and then become solidly checked.

This application is available for download here

Via- XDA-Developers

You can like us on Facebook or follow us on Twitter.

Saturday, November 10, 2012

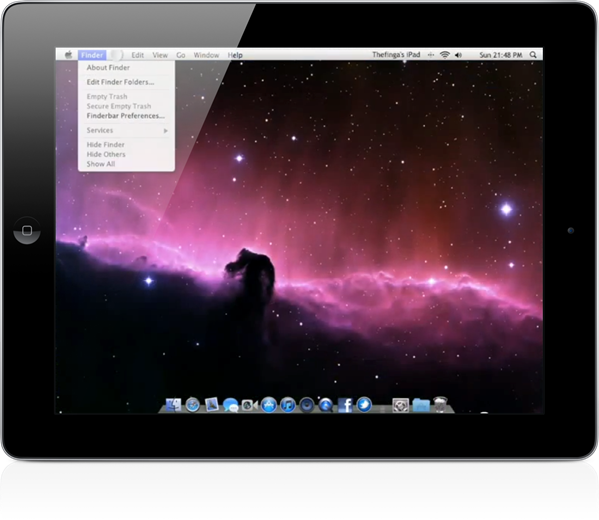
Convert Your iPad Into MAC OS X Tab With OS X Pad HD

By Sukesh Kumar(facebook)(twitter)
Want to make your iPad look and feel like a Mac? Well, a Dreamboard theme for jailbroken iPads promises to do that. Your iPad will look as if its running Apple's Mac Operating System hiding much of the iOS interface as possible. 

paddhd

The theme costs $3.50 and is available from the following repository :
      fnetdesigns.com/cydia/repo

Is it worth the money? Have a look at this video and decide for yourself.


Let us know your views via comments.

(via Redmondpie)

You can like us on Facebook or follow us on Twitter.


Friday, October 19, 2012

"Missing Plug-in" ?? OS X update will not support browsers with java contents !!

By-Harkirat Singh(Twitter)(Google+)

                                                      "Missing Plug-in" Is this the message you are getting when you are trying to run java based website, don't worry there's no fault in your laptop and you are not missing any plugins.It's just that apple has removed  Apple's own Java applet plugin from all browsers.Don't worry Java will work on your operating system,it's just the browsers which will not support java applications.
                                                      After the new update, users trying to run said applets in their browser will receive a notice that the necessary plugin isn't available, and will be directed to Oracle for the proper download.Keeping Java out of your browser removes the risk of hostile applets.


Apple is listening !

First, it stopped shipping OS X with Java pre-installed when OS X Lion (10.7) came out. Lion and Mountain Lion (10.8) include a program stub (/usr/bin/java) that offers to fetch and install Java if ever you try to use it, but it's not installed by default.
                                    Apple on their website have said that this update  is for OS X 10.7 or later.The only downside is that to acquire the needed applet plugin, you have to install Oracle's Java runtime in parallel with Apple's Java.This leaves you with twice as much Java on your Mac

Should i install the new update ??

YES Go ahead it fixes a lot of bugs ..Oracle has published a detailed Risk Matrix, if you aren't convinced to update already.

Via-nakedsecurity


You can like us on Facebook or follow us on Twitter.

Any questions or how do you feel about this post make sure you write us in the comment section.


Saturday, August 11, 2012

15 TIPS AND TRICKS FOR MOUNTAIN LION OSX !!!


(Credit: CNET)
Whether you have been using Apple's latest operating system for the Mac, OS X Mountain Lion, for a while now, or you are just installing it, you'll benefit from reading through some of the tips below. Some of them are ways to improve on the overall experience, while others will bring back past functionality. Let's get started, shall we?
Preparing your Mac
When upgrading the operating system, no matter your platform of choice, it's always a great idea to not go into it blindly. Be prepared, and more importantly, make sure you computer is prepared. Some of the prep is stuff you should be doing anyway, so make sure to give it a read if you are yet to upgrade.
Get started with Notification Center
Mountain Lion has borrowed a lot of features from iOS, including Notification Center. With OS X now having one convenient place for organizing notifications on your computer, you'll more than likely end up using it to some extent. It's best you know what it does and how to customize it.
Options for accessing Notification Center
One thing not discussed in the getting-started guide for Notification Center is all of the different ways to access it. The guide touched on gestures but left out keyboard shortcuts and hot corners. This post will lay out all of the options and shortcuts to revealing Notification Center for you.
Growl and Notification Center
Since we are on the topic of Notification Center, we should probably talk about the popular OS X notification platform Growl. If you're interested in integrating your Growl alerts into Notification Center, this post is made for you.
AirPlay mirroring
Another big feature brought from iOS to OS X is AirPlay. If you have a compatible Mac, you can now mirror your Mac's display to your TV through an Apple TV. For a video demonstration, check out this post.
AirPlay-only audio
If mirroring your display isn't something you want to take advantage of, but you want to stream the audio from your Mac through your TV, you can do it with a few clicks of the mouse.
Dictation
Using dictation to type out a quick response in Messages, a blog post, or even a lengthy e-mail can save your fingers from pounding away on the keyboard. Using dictation on Mountain Lion is simple, with almost no setup required. Just make sure you have an Internet connection.

Preview open tabs in Safari
Safari 6 was released alongside Mountain Lion, bringing a slew of new features to Apple's beloved browser. One of them is the ability to quickly preview all of the open tabs in your browser window. This is another feature that's similar to what's found on iOS. It works well and comes in handy if you're in the habit of leaving a lot of tabs open.
Bring back Web sharing
It's possible to bring back Web sharing, a feature that went missing in Mountain Lion, with a little work. If you're comfortable with Terminal, you'll feel right at home enabling Web sharing on Mountain Lion. If you aren't comfortable with Terminal, Topher Kessler does a great job laying out the required steps in a simple manner.
VIPs
We all have a shortlist of contacts whom we deem a VIP -- someone whose e-mails we respond to immediately. You can now mark those contacts as VIPs and treat them as such in Mail on Mountain Lion. You can even limit Notification Center to only show alerts for VIP e-mails and no one else.
Restore Save As
OS X Lion took away a functionality users had grown accustomed to over the years: Save As. There was plenty of bellyaching and bemoaning the missing feature throughout the OS. Enough of it, in fact, that Apple has brought back the feature in Mountain Lion. You'll need to do some setting up to get it to work, but it's back!

Expose, I missed you
Another change in OS X Lion that upset users was in how Expose behaved. In Mountain Lion, you'll need to uncheck a box in system preferences, and the old beloved Expose feature of displaying all open windows, instead of just one per open program will be restored.

Keep it secure
You can now encrypt a disk volume with a simple click, securing your data with almost no effort. There are some caveats that you need to be aware, however, of before you dive right in.
Sync Notes with Android
The new and improved Notes app on Mountain Lion is built to be used with Apple's iCloud service, allowing for easy syncing between all iCloud-enabled devices. This guide will not only show you how to sync iCloud devices, but also how to sync your Android devices with the Notes app.
Sync iOS with Mountain Lion
iCloud is built into OS X Mountain Lion from the ground up. Between syncing documents from Preview and Pages to contacts and calendars, iCloud is handling it all. As such, you'll want to make sure your iOS device is taking advantage of as much of the cloud as possible. This great walkthrough will show you how easy it is to be achieved.
SOURCE-CNET

Share

Twitter Delicious Facebook Digg Stumbleupon Favorites More