Hackinthus: howto

Lava Launched Xolo X1000 In Goa Teasing "Fastest SmartPhone"


Lava Xolo X1000!!


Katrina Kaif Launches Sony Xperia Z Smartphone And Tablets


Sony Xperia Z


Samsung Galaxy S4 : Event Round Up, Specs, Pricing and Availability

Samsung Galaxy S4.

Nokia Lumia 620 Review

Nokia's most affordable Windows Phone 8 device, Nokia Lumia 620

Install Instagram Unofficially On Blackberry Z10

How To Install Instagram Unofficially On Blackberry Z10 [Video] !!

Showing posts with label howto. Show all posts

Thursday, April 25, 2013

"Install Big Games" And Solve The Problem Of "No Memory Available" On Samsung Champ

Low end phones always have very less memory on their device and people who own these phones are not able to enjoy games that require a little bit of more space on the device so that they can enjoy games more than 500 kb .

So here is a little trick that I saw on a blog dhavalthakur which can help you to play higher end games.


Install Big Games
  • Take your Mobile and Go To your Keypad.
  • In Keypad type *#52828378# and hit Call Button.
  • A new Window of Settings will open up.
  • In that window go to the OTA Test Option and open it
  • There Choose Maximum Jar size option and change its digit to 3000 or an other big value (this means that if type 3000,then now your cellphone download size will be of till 3000kb).
After you have inserted your desired memory,Click on Save.


No Memory Available Problem 


  • Take your Mobile and Go To your Keypad.
  • In Keypad type *#52828378# and hit Call Button.
  • Then there choose Memory Test option.
  • There Change the Java Heap Value to 1760.
  • Also Change the Midlet Heap Option to 2000.
Hence You are Done!

So this is a really nice trick provided by dhaval which will help users of Samsung Champ And other low end Samsung Devices

Tuesday, April 09, 2013

Get All Paid iOS Apps For Free Without Jailbreak

After you get your new iPhone the first thing that you do is search for it's Unlocking or Jail-breaking because most of the good apps are Paid on iOS platform.Few days back we taught you how to download Free apps on android without rooting  so this time we thought to tell you about iOS.

I got this tip from one of my friend Nirmal who has been using android for quite a while and has shifted to iOS recently and was about to jailbreak his device when he saw a very unique thing and tried it and by God's grace it was working.

This website named 25PP allows you to download all the paid iOS apps for free without any jailbreak.It's in Chinese so you might face a little problem operating it and I will guide you through the steps so you can use it easily.

First Step:

Go to www.25pp.com

Second Step:

Select the app You want to download and then click on the blue icon to download it.


Third Step : 

Click on the Blue PPassistant(WIN) or the highlighted part as shown in the Picture


Fourth Step:

Install the Software It is like itunes.


Fifth Step:

Download an app and then connect your phone,click on the app to download it on your device.It works in a similar fashion as itunes,But there's a glitch here as it is in Chinese so you will not know where to click.So we have made it simpler by highlighting it and now you can easily download all the paid apps for free.

Right Click on the app,go to the second option and you will see the name of your device click on it and your app will be downloaded on phone !!


I would Again like to thank Nirmal for this useful Tip as it is really usefull.

Tuesday, March 26, 2013

Tips To Get Followers On Instagram

'Just Instagram It' - We often hear this term now-a-days. Instagram is yet another social networking platform where user share their memories & moments in form of pictures. One can easily edit any image via defined filter and make it look more vibrant and attractive.


 Now, Instagram is smilar to twitter. You want people to follow you. So, here we are giving you some tips as to how one can get followers on instagram.

1. Never ever hesitate to follow any user. If someone likes your photo, Do follow him.
2. Always use hash tags while sharing pictures. It allows various random users to view your pictures and like them. 
3. Like random pictures on popular hash tags like #instagood #instaclick #instafood. 
4. Always use #followme and #follow4followback tags while sharing your pictures and when users start following you, do follow back.
5. Search #follow4followback tag on 'search by tag' and start following those users because most of them will start following you back.

I am not much of an instagram freak but when I followed these few steps, I easily got around 30-40 followers in just one night.

Happy Instagraming!!


You can also like us on Facebook or follow us on Twitter.


About Author :
Sukesh Kumar is long time iOS user who currently shifted to Android. He is currently pursuing his Engineering in Bangalore as a computer science student. His love towards his gadgets and experimenting with it's features brought him close towards blogging and writing about technical stuffs. Read More


Friday, March 22, 2013

How To Install Instagram Unofficially On Blackberry Z10 [Video]


Blackberry has become a recognized Smartphone these days. However not all notable Apps are yet available in recent Blackberry 10 OS but still people owning such smartphone crave of somehow getting those apps. Either officially or perhaps unofficially.


Image Credit: Gadgetsboy.com
 Good news for the Blackberry Z10 users who are in love with famous photo sharing & editing app Instagram can now install and run safely a stable version of Instagram on their Blackberry Z10.

The official Instagram is not yet available on the Blackberry App world yet but there are some easy techniques to install it on your Blackberry Z10 as it's confirmed working stable on that Smartphone.


However, it's not too straight & simple as that in android phones just requiring an .apk file and installing on your device, but the blackberry installing procedure is somehow little different.

First of all you will require the Bar file, download here.
Then you need DDPB which allows installing from external source to your device download here.
Your computer should have Java Runtime installed before continuing the process.

Follow the video below to gather complete process of installation.


The above video is just a glimpse of Instagram running on Blackberry Z10 thanks to saadi703.

Another video which was made for installing Whatsapp below is the actual process however do not forget the bar file you will use is the one above mentioned, it's just a process which is similar to that of Whatsapp installation steps.


The app works great on Blackberry Z 10 and the installation steps is only tested for that device only. So if you are trying to get it on any other Blackberry handset with the above procedure then you may likely find yourself in some trouble.

You can also like us on Facebook or follow us on Twitter.

You can leave us your feedback in the comment section below.

Video Credits: Saadi703

Saturday, March 02, 2013

How To Install Jelly Bean 4.1.2 In Samsung Galaxy Note GT N 7000


Samsung has launched Jelly Bean Android Version 4.1.2 in various parts of world. They have a habit of rolling updates in one region and then passing over the whole world. There is nothing such as world wide release which Apple does.

Now what do other user do to get the Firmware which is released for other countries? Simply waiting for the same thing which you are about to get from your Kies or directly is useless. I am when we can assure you that nothing happens to your phone it's the same but only you have to do it manually.

So if you have Samsung Galaxy GT N 7000 and you are willing to get yourself the Jelly bean 4.1.2 update it's easy and carefully follow the instructions below.

Download the Firmware of Jelly Bean 4.1.2 from here. It links you to the website for Samsung Updates of various firmwares. Select the first one from Germany and download it. Or download it from here (Hong Kong, Taiwan) gives you the direct link.

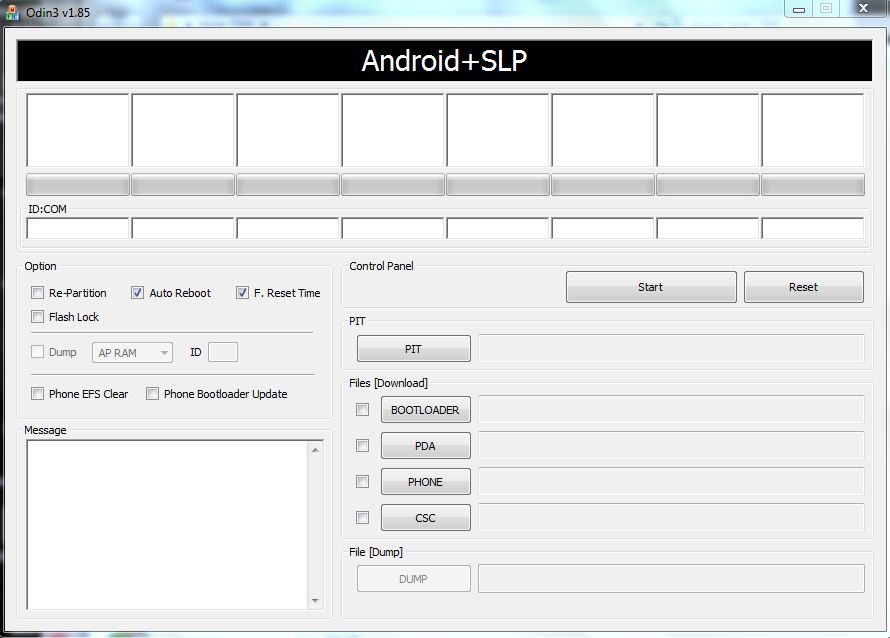
Secondly you will need Odin v1.85 and extract the file.

To go ahead with the process after you have downloaded the file make sure you have Samsung Kies installed on your PC otherwise there could be problem recognizing the drivers. 

Enable Phone's USB debugging mode from your phone's settings and make sure your phone is fully charged. It is recommended to make a proper backup of your phone's data as during any issue your phone is recovered. 

Launch Odin now and run it in Administrator mode-


Click To Zoom

Power off Galaxy Note and put it on the Download Mode. To do this, press and hold the Volume Down and Home buttons while pressing the Power button until the Samsung Galaxy logo appears on the screen.

Connect the phone in download mode with your USB connected to PC running Odin.

Now click on PDA and browse the ".md5" file you have downloaded above. Make sure the Auto Reboot and F.Reset Time is set. 


Click To Zoom
You are ready to go now, hot the start button and wait for the process to complete itself. After the process is done Samsung logo will pop up and it will take few more minutes to load. However your data wont be lost. In case you had previously rooted before installing this your root will vanish. 


Some of the key features of the Android 4.1.2 Jelly Bean update (Build JZO54K) for Samsung Galaxy Note (GT-N7000) include:

- Smooth performance and stability

- Multi-View (Multi Windows Multitasking, same as in Note 2)

- Multi-View can also be disabled

- Page Buddy

- Customizable Notification Panel

- New additions in Notification Panel

- Smart Rotation

- Samsung’s S Cloud services

- Features like Direct Call, Smart Stay and Pop-up Play

- New widgets from the Galaxy S3

- Two Home screen modes

- New Notifications bar

- Google Now

You can also like us on Facebook or follow us on Twitter.

Overall it's perfect until you overload your RAM.

Got any doubt make sure to ask us in the comment section.

Tuesday, February 19, 2013

How To Make WhatsApp Free For Lifetime

"WhatsApp", A revolutionary messaging application  which completely eliminated the so called term 'SMS'. Now, people usually refer to the phrase "WhatsApp me" instead of "message me". Now, the problem with WhatsApp is that you have to pay 0.99$ on iOS to get it but once you purchase it, it's free for lifetime. Whereas, on Android and other platforms it's free for 1 year after which you have to pay 0.99$ every year to use it. Quiet disappointing. But there's always a way to get things for free and same goes for Whatsapp too. Today, I am gonna tell you how to make WhatsApp's subscription free for lifetime.


All you need is, 
  • Apple Account 
  • Patience 
  • iPhone (temporary)
Lets begin.
Starting of with 'Apple Account', you need to create one. Just download and install 'itunes' and from there you can easily create your Apple account.

Next comes 'Patience'. It's quiet a tradition on iOS where they giveaway various apps for free of cost. So, every year there's a period when 'Whatsapp' is completely free on iOS, i.e, lifetime subscription. 
So have patience and wait for that period to come. Don't worry, stay tuned to Hackinthus and we will let you know.

Finally, you need an 'iPhone' which you can easily borrow from one of your friends. Once you have downloaded WhatsApp from App store for free from your account, install it on your friend's iPhone with your own SIM card in it.(Don't Forget to first Log Out from his Apple account and then Log In via yours).
After installing, just enter the required data and done!!(Just for Safety message few of your buddies using iPhone and then log out from your Whatsapp's account).

Take out the SIM card and put it back into your Android phone, install WhatsApp in it via the usual procedure and then go to Settings -> Account -> Payment and you shall be greeted with this screen.


Now, I am not sure about this trick working on every single device or platform. But incase you are having any sort of problem, feel free to comment below so that we can help you out.

You can also like us on Facebook or follow us on Twitter.


Monday, February 04, 2013

How to Jailbreak iOS 6 Untethered[Windows / Mac / Linux]


It's finally out and your patience have paid well since the release of iOS 6.x untethered jailbreak is out. Let me not take you round about talking about it's feature and why do we need that but i should come directly the method how do you do that. Please go through each words carefully so that you may not brick your iPhone, iPad or iPad.


Requirements:


  • You won't need much time to Jailbreak your iPhone just couple of minutes or 5 will do.
  • A computer, running Windows (XP minimum), Mac OS X (10.5 minimum) or Linux (x86 / x86_64).
  • An iPhone, iPad or iPod running iOS 6.0 through 6.1 (You may check in Settings / General / About => Version so that you may not mess up while you proceed.)
  • A USB cable to connect the device to the computer.

Important Notifications:

  • Before you begin, backup your device using iTunes (or iCloud) before using evasi0n. If something breaks, you'll always be able to recover your data.
  • Please disable the lock pass-code of your iOS device before using evasi0n. It can cause issues.
  • Avoid all iOS and iTunes related tasks until evasi0n is complete.
  • If the process gets stuck somewhere, it's safe to restart the program, reboot the device (if necessary by holding down Power and Home until it shuts down), and rerun the process.
  • If you get an error on OS X 10.8 saying that evasi0n can't be opened, control-click (or right-click) the app and on the revealed context menu, choose 'Open.' On the ensuing dialogue box, choose 'Open' as well.

Download Links:

As we know we work on different Operating Systems so you dont need to worry about getting a specific platform for Jailbreaking your device.
Download the file of your suitable platform you are on and make sure you have followed the above specifications carefully.
Extract the files and then run the file evasi0n.exe (for windows) eg
Follow the on screen instructions!


Have a nice time jailbreaking your device.

You can also like us on Facebook or follow us on Twitter.

Source: evasi0n

Sunday, February 03, 2013

How To Port Sony Xperia Jelly Bean 4.1 Lock Screen To Other Xperia Running ICS


There is a cool thing that has been launched for Ice Cream Sandwitch Sony Xperia users. A senior member in XDA erorcun has found a new way from which we can get Android Jelly Bean 4.1 lock-screen on any other ICS Sony Xperia device.


The list of supported device for this technique includes Xperia Arc, Xperia Ray, Xperia Sola and Xperia S. There are however two versions of lock-screen. The first features permanent ‘slide-to-unlock’ text in the middle of the screen, whereas the second only displays the text after the third unlock attempt.


It works on all ICS roms which supports ICS Xperia lock-screen and you will probably require a minimum RAM usage of 2.5 MB.

 All you have to do is first don't try to install it - put it to system/app, set right permissions and reboot. You are done!

It will appear like the image below-

Credit: XDA-Developers

Download Links:


  • If you want permanent "slide-to-unlock" text - Don't forget to delete "(2)" at the end.

Download Link


  • If you don't want to see it after 3 unlock get it here.
Download Link


Sony’s Jelly Bean lock screen is a very attractive update from the standard used ‘left-to-right slide’ lock screen of previous Xperia devices, and this may tide many Xperia users over till the official Android Jelly Bean update.

You can also like us on Facebook or also follow us on Twitter.

Source: XDA-Developers

Monday, January 14, 2013

How To Hide A Drive In Windows !!

Hiding things and sending secret messages is not a Practice of this era.It has been in our civilization from the evolution of human kind,but this era is a little different and need HI-TECH methods to keep their Data secure and hidden.

You might be accustomed with normal procedure of hiding a file or folder with normal hide and show hidden file procedures but how about hiding the whole drive ?? Confused,No need to be,this is possible with simple registry hacking technique and a simple software called NoDevicesmanager .Not only this you can even hide DVD and CD drives .


Here's a screen shot of the application,you can see the names of multiple drives named A: to Z:,just check the drive you want to hide and click on save changes,You can also set a password to the application so that there is no Unauthorised usage.

This is a very important tool for people who don't posses a Hard Disk.They can easily create a small partition in the windows and hide their secret Photos,Videos,important Documents etc,and no one will ever know !!

Note- You have to restart windows explorer or even your system for this change to take place !!


You can see my C: D: and G:
The selected Drives are hidden
 If you have any doubts feel free to contact !!

You can also like us on Facebook or follow us on Twitter.

Via-labnol

Saturday, January 12, 2013

Registry hacking to Increase Touch Screen Responsiveness on the Microsoft Surface

When we buy a laptop or mobile phone, their performance level is locked to a certain level even if they can work to a higher level for reasons such as prohibiting more power usage or more memory usage. But if you want to increase the limit of any of the features you just have to hack into your system and change its limit. Today i will be telling you how to increase the touch screen responsiveness on the Microsoft Surface, this is a very small and easy kind of hack which includes Registry modification.
Photo credits-XDA Developers

Procedure-

  • Search "regedit" and Run Registry Editor in your Microsoft Surface.
  • Go to this key : HKEY_LOCAL_MACHINE\SOFTWARE\Microsoft\TouchPredict ion
  • Edit key for latency from 8 to 2.
  • Edit sample time from 8 to 2
  • Restart your Surface
Now your Surface is ready with increased touch screen responsiveness but there is a small disadvantage of this, that is the battery backup will decrease by a small amount as the screen draws more power. 

Note- Perform this procedure on our own risk Hackinthus is not responsible for any damage to your device.

Source-XDA Developers

Saturday, January 05, 2013

How To Root Kindle Fire HD or 2 On Mac/Linux OS


Rooting a Kindle Fire HD or Kindle Fire 2 was already out for a period of time for the users running on Windows, but what about people running on Mac and Linux. We have seen whenever it was time for iOS jailbreak release it used to first appear on Mac and then people waited for Windows. iOS occupy huge market area and that's why the demand for Windows is always there.

What about the people having Kindle Fire HD or Kindle Fire 2 who want to get rooted on Mac/Linux. Recently an XDA-Developer Senior Member prokennexusa has written for people on Mac/Linux which have been tested with Ubuntu and Mac OS X 10.5.8

Before proceeding with Rooting process please check these conditions and proceed otherwise you may brick your device.


1. Software: Linux (tested on Ubuntu Linux, Lucid Lynx) or Mac OS X 10.5.8 or later (x86 only).

2. Hardware: Free USB 2.0 or Greater Port.

3. Software: Linux GNU C Library (glibc) 2.7 or later is required, On Ubuntu Linux, version 8.04 or later is required, 64-bit distributions must be capable of running 32-bit applications

4. Hardware: Kindle Fire HD 7" or Kindle Fire 2 7".


Follow These Steps Carefully:-

  • Unplug the Kindle from USB. Go to your Kindle, navigate to the pull down options bar, choose More > Security
  • Be sure to Enable ADB by clicking On
  • Go to your Kindle, navigate to the pull down options bar, choose More > Device
  • Be sure to Allow Installation of Applications by clicking On

Root Kindle Fire HD 

Step 1: Go to your Mac or Linux workstation, download and install the Android SDK paying close attention to the install path. - Mac OS X/Linux 

Step 1.1: Go to your Mac or Linux workstation, download and unzip Root MANY ANDROID!. Pay close attention to the path where you unzipped Root_with_Restore_by_Bin4ry_v17.


 Step 2: Reboot.,After reboot is completed, plug the Kindle into the free USB 2.0 Port. Wait for the driver to install about 2 minutes. Mac OS X and Linux do not require any drivers, the default driver built into these platforms will be sufficient.

Step 3: Open up the Android SDK GUI, click Update as needed so the SDK is running the latest version.

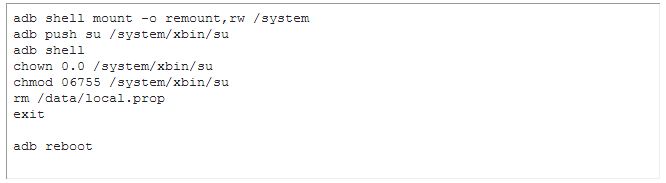
Step 4: Open up a Terminal, at the Terminal window ($ command prompt) type:

Code:
Click to zoom
Now, enter your Root Password if requested to do so. You should now see a # at the command prompt.

Step 5: Download Superuser-3.1.3-arm-signed.

Step 6: Unzip Superuser-3.1.3-arm-signed.zip to Superuser-3.1.3-arm-signed.

Step 7: Copy the entire contents of Superuser-3.1.3-arm-signed to /Android/android-sdk/platform-tools/ (Step 1 install path).

Step 7.1: Next go back to the open command prompt, at the /Root_with_Restore_by_Bin4ry_v17/#  enter:

Code:
Click To Zoom

Choose option 1, Run Normal Method and ignore errors. Be careful now and pay attention, you will need to answer "Restore" a dialogue box on the Kindle. Click on Restore. When the program has completed, the Kindle will Reboot.

The forum notes can be found here: Root MANY ANDROID! Forum.


 Step 7.2: When the Kindle reboots it will react very slowly, this is normal - leave it alone. Immediately proceed to Step 8 & make sure the Kindle is still plugged into USB.

Step 8: Next go back to the open command prompt, at the /Android/android-sdk/platform-tools/# enter

Code:
Click To Zoom
 Step 9: After the Kindle Reboots, wait 2 minutes, then go back to the open command prompt, at the /Android/android-sdk/platform-tools/# enter:

Code:
Click To Zoom

Step 10: After the Kindle Reboots, wait 2 minutes, then go back to the open command prompt, at the /Android/android-sdk/platform-tools/# enter:

Code:
Click To Zoom

Step 11: After the Kindle Reboots, wait 2 minutes, then go back to the open command prompt, at the /Android/android-sdk/platform-tools/# enter:

Code:
Click To Zoom

Step 12: After the Kindle Reboots, wait 2 minutes, then go back to the open command prompt, at the /Android/android-sdk/platform-tools/# enter:

Code:
Click To Zoom

Step 13: Finally go back to the Kindle, navigate to the /Apps tab, click on Device, next find and click on Superuser.apk initialize the Superuser daemon.

Step 14: Finally, using Silk, Opera, Mozilla or Dolphin Download suchecker.apk: https://dl.dropbox.com/u/54456659/suchecker.apk. After the download has completed, choose Open, then Install to install the apk.

Step 15: When the install has finished, go to your Apps. Launch Root Checker Basic When you check Root you will be presented with a "Allow" dialog box, be sure to Allow Root Checker. You should now see that Superuser.apk is working.

You should now have root AND if this is true your ADB communication is also functional!

Finally, let's disable the Amazon OTA (Over The Air) Updates so your hard work is not destroyed.

OTA Step 1: Delete or move /system/ect/security/otacerts.zip to /sdcard/download.

OTA Step 2: Reboot the Kindle.

Note: You do not loose functionality and you may still install the updates manually after you have read the install notes and know what to expect. The updates and manual install instructions can be found on Amazon Support here.

Attached Files:


You can also like us on Facebook or follow us on Twitter.

Source: XDA-Developers

Wednesday, December 26, 2012

Creating new hard disk partitions in Windows 7 or Vista

By- Rustam Ali


Normally when you purchase a PC, the number of partitions provided for hard disk do not seem adequate and you have no other choice than compromising with it. What if you could create hard disk partitions by yourself in your PC??
It is possible and today i will explain you the steps in order to create a new hard disk partition in your Windows 7 or Vista PC.

1.Click on Start button.  


    2.Type Disk Management in the search column.

      
    3.Select Create and format hard disk partitions.


    4.Select the Drive from which you can draw the required memory to create a new partition. In my case i am having space in D Drive.


    5.Right click on the D Drive and select Shrink Volume.


    6.It will take some time and then show you a dialog box as shown below 


    7.In the space provided Enter the amount of space to shrink in MB, enter the memory. As in my case i have entered 10240 MB that equals 10 GB.


    8.Then click on Shrink which will create a new volume of 10 GB and will be showed in green color that is free memory.


    9.Right click on New simple volume and then just keep pressing next.


    10.At last a new partition will be created.


    Share

    Twitter Delicious Facebook Digg Stumbleupon Favorites More