Hackinthus: rooting

Lava Launched Xolo X1000 In Goa Teasing "Fastest SmartPhone"


Lava Xolo X1000!!


Katrina Kaif Launches Sony Xperia Z Smartphone And Tablets


Sony Xperia Z


Samsung Galaxy S4 : Event Round Up, Specs, Pricing and Availability

Samsung Galaxy S4.

Nokia Lumia 620 Review

Nokia's most affordable Windows Phone 8 device, Nokia Lumia 620

Install Instagram Unofficially On Blackberry Z10

How To Install Instagram Unofficially On Blackberry Z10 [Video] !!

Showing posts with label rooting. Show all posts

Wednesday, June 12, 2013

Flash Your Android Device Wirelessly Using RemoteFlash

Many people after buying there smart phones, are satisfied by the features that the company has provided with the phone. But there are a second group of people too who want to explore their devices to the fullest by flashing custom ROM or flashing any new update or adding a modded feature of some other phone to enhance the properties of their phone. At the time of flashing or rooting you require a USB cable and a laptop, but many a times you will not find the USB cable in place or it would be not in a good condition due to frequent use. Despite of this if a person uses this faulty USB cable for flashing then its mere risk.

To minimize this risk developers have come up with a application which will allow users to flash there phones wirelessly. The application is called as 'RemoteFlash'. It allows you to flash ROMS, Mods, and Updates directly from your computer, over WiFi.  APK's can also be installed on your device  wirelessly using this application.

This application consists of two files. The first  one being a standalone Java application that will  run on your computer and  the other file is the RemoteFlash apk which will be installed in your android device. The PC and the android device should be connected to each other via same WiFi network.

Procedure-:

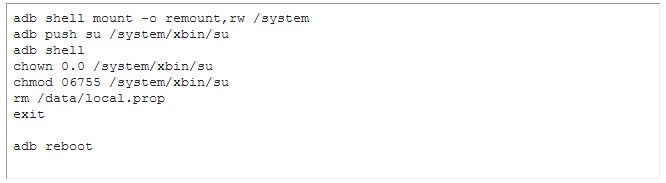
  • Install the java application on your PC and the APK on your android device.
  • Run the RemoteFlash apk.
  • Reboot the device.
  • As soon as your device boots back up, RemoteFlash will be running.
  • Open the PC client and click "Auto-Scan".
  • Check/uncheck "Wipe Data/Cache", and click "Go".
  • Select the file to be flashed, and it will be flashed directly to your device.
Links -:
JAVA application for PC "RemoteFlashPC-V0.3.jar" can be downloaded from here.


APK for android device "RemoteFlashV1.1.apk" can be downloaded from here

Source- XDA-Developers

Saturday, January 05, 2013

How To Root Kindle Fire HD or 2 On Mac/Linux OS


Rooting a Kindle Fire HD or Kindle Fire 2 was already out for a period of time for the users running on Windows, but what about people running on Mac and Linux. We have seen whenever it was time for iOS jailbreak release it used to first appear on Mac and then people waited for Windows. iOS occupy huge market area and that's why the demand for Windows is always there.

What about the people having Kindle Fire HD or Kindle Fire 2 who want to get rooted on Mac/Linux. Recently an XDA-Developer Senior Member prokennexusa has written for people on Mac/Linux which have been tested with Ubuntu and Mac OS X 10.5.8

Before proceeding with Rooting process please check these conditions and proceed otherwise you may brick your device.


1. Software: Linux (tested on Ubuntu Linux, Lucid Lynx) or Mac OS X 10.5.8 or later (x86 only).

2. Hardware: Free USB 2.0 or Greater Port.

3. Software: Linux GNU C Library (glibc) 2.7 or later is required, On Ubuntu Linux, version 8.04 or later is required, 64-bit distributions must be capable of running 32-bit applications

4. Hardware: Kindle Fire HD 7" or Kindle Fire 2 7".


Follow These Steps Carefully:-

  • Unplug the Kindle from USB. Go to your Kindle, navigate to the pull down options bar, choose More > Security
  • Be sure to Enable ADB by clicking On
  • Go to your Kindle, navigate to the pull down options bar, choose More > Device
  • Be sure to Allow Installation of Applications by clicking On

Root Kindle Fire HD 

Step 1: Go to your Mac or Linux workstation, download and install the Android SDK paying close attention to the install path. - Mac OS X/Linux 

Step 1.1: Go to your Mac or Linux workstation, download and unzip Root MANY ANDROID!. Pay close attention to the path where you unzipped Root_with_Restore_by_Bin4ry_v17.


 Step 2: Reboot.,After reboot is completed, plug the Kindle into the free USB 2.0 Port. Wait for the driver to install about 2 minutes. Mac OS X and Linux do not require any drivers, the default driver built into these platforms will be sufficient.

Step 3: Open up the Android SDK GUI, click Update as needed so the SDK is running the latest version.

Step 4: Open up a Terminal, at the Terminal window ($ command prompt) type:

Code:
Click to zoom
Now, enter your Root Password if requested to do so. You should now see a # at the command prompt.

Step 5: Download Superuser-3.1.3-arm-signed.

Step 6: Unzip Superuser-3.1.3-arm-signed.zip to Superuser-3.1.3-arm-signed.

Step 7: Copy the entire contents of Superuser-3.1.3-arm-signed to /Android/android-sdk/platform-tools/ (Step 1 install path).

Step 7.1: Next go back to the open command prompt, at the /Root_with_Restore_by_Bin4ry_v17/#  enter:

Code:
Click To Zoom

Choose option 1, Run Normal Method and ignore errors. Be careful now and pay attention, you will need to answer "Restore" a dialogue box on the Kindle. Click on Restore. When the program has completed, the Kindle will Reboot.

The forum notes can be found here: Root MANY ANDROID! Forum.


 Step 7.2: When the Kindle reboots it will react very slowly, this is normal - leave it alone. Immediately proceed to Step 8 & make sure the Kindle is still plugged into USB.

Step 8: Next go back to the open command prompt, at the /Android/android-sdk/platform-tools/# enter

Code:
Click To Zoom
 Step 9: After the Kindle Reboots, wait 2 minutes, then go back to the open command prompt, at the /Android/android-sdk/platform-tools/# enter:

Code:
Click To Zoom

Step 10: After the Kindle Reboots, wait 2 minutes, then go back to the open command prompt, at the /Android/android-sdk/platform-tools/# enter:

Code:
Click To Zoom

Step 11: After the Kindle Reboots, wait 2 minutes, then go back to the open command prompt, at the /Android/android-sdk/platform-tools/# enter:

Code:
Click To Zoom

Step 12: After the Kindle Reboots, wait 2 minutes, then go back to the open command prompt, at the /Android/android-sdk/platform-tools/# enter:

Code:
Click To Zoom

Step 13: Finally go back to the Kindle, navigate to the /Apps tab, click on Device, next find and click on Superuser.apk initialize the Superuser daemon.

Step 14: Finally, using Silk, Opera, Mozilla or Dolphin Download suchecker.apk: https://dl.dropbox.com/u/54456659/suchecker.apk. After the download has completed, choose Open, then Install to install the apk.

Step 15: When the install has finished, go to your Apps. Launch Root Checker Basic When you check Root you will be presented with a "Allow" dialog box, be sure to Allow Root Checker. You should now see that Superuser.apk is working.

You should now have root AND if this is true your ADB communication is also functional!

Finally, let's disable the Amazon OTA (Over The Air) Updates so your hard work is not destroyed.

OTA Step 1: Delete or move /system/ect/security/otacerts.zip to /sdcard/download.

OTA Step 2: Reboot the Kindle.

Note: You do not loose functionality and you may still install the updates manually after you have read the install notes and know what to expect. The updates and manual install instructions can be found on Amazon Support here.

Attached Files:


You can also like us on Facebook or follow us on Twitter.

Source: XDA-Developers

Wednesday, December 19, 2012

Root Exploit On Exynos Leaves Samsung Galaxy S & Galaxy Note Devices In Danger

Major flaw in Samsung's Exynos devices has been found by XDA developers. XDA member Alephzain discovered a way to obtain root into his Galaxy S III, without flashing with odin. Looks like Samsung Kernel allow read & write access to all physical memory in the device, even the kernel, but also leaves Samsung's device prone to attack. It means apps on the Google Play Store would be able to use Kernel code injections and or RAM dumps, which is not so good for your phone and data.


image credit- pcadvisor


Luckily a fix has been already been made by XDA member RyanZA which patches and modifies write permissions on device that might be affected. It sadly won't let you use your camera app on Galaxy devices( S & Note). There's also a root-free solution for which you have to install an APK file, which can be enabled or disabled manually so that you can use the camera till Samsung fixes this issue.
Refer to source below for further guidance.

XDA DEVELOPER 


(via - Unleashthephones)

You can like us on Facebook or follow us on Twitter

Friday, December 07, 2012

Get The Multi-Window Feature On Your Samsung Galaxy S II

Are you missing the Multi-Window feature on your Samsung Galaxy S II ?? Do you badly want it?
Well, Thanks to XDA Developers for making it possible.
There are two methods to achieve it, one is simple whereas the other one is tough to  implement. 
The only thing required is your Galaxy S II running a deodexed ROM based on XXSJ, or in easy term, Android 4.1.2.


Along with the multi-window feature, you also get few other kick-ups, such as the 4 icons shortcut on your lock screen and you can also skip songs with volume rocker.


Once you’ve installed it successfully  you can enjoy the full-on multi-window functionality on your Galaxy S II.

To begin, simply check out the two methods from the link below, and make sure you follow all instructions carefully.

XDA Developer - Multi-Window Feature On Samsung Galaxy S II

(via - Redmondpie)

You can like us on Facebook or follow us on Twitter

Wednesday, December 05, 2012

Root Samsung Galaxy S III

By Harsh Vardhan (Facebook) (Twitter)


Did You Always found difficulty in Rooting your Samsung Galaxy S III. In this post we explain you how to easily root your device. The popularity of the Samsung Galaxy S III and its variants have produced a few rooting methods. There are many features you can gain by rooting your device. The three step-by-step instructions on how to gain root access on your Samsung Galaxy S III.

The Method is Summed up in three steps.The first process posted by XDA Recognized Contributor mrRobinson works for the AT&T, T-Mobile and Sprint US variants. This method typically does not trip the flash counter, but can take some time. The second method is by XDA Elite Recognized Developer Chainfire. This works for the three aforementioned US variants and the International version. This method is quick, but it does trip the flash counter. Finally, we cover the use of XDA Senior Moderator and Recognized Developer mskip’s toolkit. This is a semi-automatic method and does trip the flash counter. So take a moment and check this video out.


You can like us on Facebook or follow us on Twitter.
Source: Xda-Developers

Sunday, November 25, 2012

How To Root Samsung Galaxy Camera On Android Jelly Bean

The very first question that pop up into your head when you get an android device is, how to root this thing? And its the same with Samsung Galaxy Camera recently launched in India.
Well, thanks to  XDA Developers, proper method to root Samsung Galaxy Camera is out.


DISCLAIMER : Hackinthus will not be held responsible if you lose data or your device gets damaged while following this guide. Proceed at your own risk.


Requirements
The instructions provided below are for Windows OS, as Odin works on that.
You can do the same with Heimdall on Linux.

  • Required recovery & cache package
  • Odin3 Flashing tool version 1.85
  • Jellybean 4.1.1 build:GC100XXALK1 (required only if your current firmware refuses to accept the CF root used above)
  • USB Drivers for your Galaxy Camera
All these files can be downloaded via link provided at the end. 

Procedure

Step 1: Extract the CF-Auto-Root-gd1-ekgc100.tar.md5 file from the recovery and cache package that you downloaded, and keep it in the same folder as Odin.

Step 2: Open Odin3 1.85 as administrator by right-clicking on it and choosing “Run as administrator”.

Step 3: Start the Galaxy Camera in download mode (Turn it off, and turn back on while pressing and holding Volume Down+Camera+Power).

Step 4: Connect the Samsung Galaxy camera to PC using USB cable. If drivers are installed fine, the first box under ID:COM will turn yellow.

Step 5: Hit the PDA button and point to the .tar.md5 file you extracted in step 1. Do not make any other changes, but make sure Re-Partition is UNCHECKED.

Step 6: Click Start, and wait for the process to complete.

Done!! Your Samsung Galaxy Camera is rooted!!

For more clarification and to download the required files mentioned above, refer to the link below :

You can like us on Facebook or follow us on Twitter.

(via Redmondpie)


Thursday, November 22, 2012

Rooting solution for Nexus 4

By-Rustam Ali


Just as the Google Nexus 4 got released, developers around the world started looking out for ways of unlocking its boot loader and in no time they figured a way out also. They got two such applications ClockworkMod Recovery 6.0.1.9 and Team Win Recovery Project 2.3.3 touch recovery. Both these applications have been developed by XDA Developers and have been tested as well.


Team Win Recovery Project 2.3, or twrp2 for short, is a custom recovery built with ease of use and customization in mind. It’s a fully touch driven user interface – no more volume rocker or power buttons to mash. The GUI is also fully XML driven and completely theme-able. You can get this aplication here.

For CWM Recovery download click here.

Via- XDA Developers

You can like us on Facebook and follow us on Twitter

Monday, November 05, 2012

How To Root Sony Ericsson Xperia Pro MK16i

Shared By - Sukesh Kumar(facebook)(twitter)

Method to root your Xperia Pro with Android 4.0.4 with Build number 4.1.B.0.587

CONFIRMED WORKING ON LOCKED/UNLOCKED BOOTLOADER


DISCLAIMER : Hackinthus will not be held responsible if you lose data or your device gets damaged while following this guide. Proceed at your own risk.

Files Required:

1. Android 4.0.3 Kernel 4.1.A.0.562  ((If this does not work use 4.1.B.0.431 kernel)

2. ROM for Xperia Pro MK16i/a ICS 4.0.4 Newest Build Number 4.1.B.0.587. Download

3. Flashtool 

4. Flashtool Drivers for your Device (In this case Xperia Pro)

5. DooMLoRD_v1_Xperia-2011-ICS-ROOT-emu-busybox-su.zip

       Download the file and save it on c:\ 
       Extract ALL the files in the zip


Before you begin, 

  • enable "USB DEBUGGING" 
Settings -> Developer Options -> USB Debugging
  • enable "UNKNOWN SOURCES" 
Settings -> Security -> Unknown sources


How To :

Phase 'A'

1. Install Flashtool

2. Install Flashtool Drivers

3. Flash the Android 4.0.3 Kernel 4.1.A.0.562 i.e File number 1 in the above list.

a. Copy the downloaded file into C:\Flashtool\firmwares\

b. Run Flashtool -> Flashmode -> select the file

c. Select No Verification

d. Click OK

e. Follow the instruction

wait until you see 'Ending flash session'
INFO - Flashing finished.
INFO - Please wait. Phone will reboot
INFO - For flashtool, Unknown Sources and Debugging must be checked in phone settings
INFO - Device connected in flash mode

YOUR PHONE WILL NOT BOOT AT THIS POINT BECAUSE OF KERNEL|BOOTLOADER MISMATCH

WARNING: AT THIS POINT CLOSE FLASHTOOL AND SUS(if running)

4. Now you have Android 4.0.3 Kernel 4.1.A.0.562, now you can follow DooMLoRD's method, it goes like this

a. Go to C:\DooMLoRD_v1_Xperia-2011-ICS-ROOT-emu-busybox-su 

b. Hit runme.bat

c. Read the on screen instructions

d. Device will reboot a couple of times

e. When the script finishes it will say "ALL DONE"
Remember to hit ENTER when your phone's LED lights up.. Front key LED, If the Phone Doesnt turn ON, remove battery and restart

5. At this point your phone is ROOTED!!

Phase 'B'

6. Now you need to load the final kernel.

a. Extract ROM for Xperia Pro MK16i/a ICS 4.0.4 Newest Build Number 4.1.B.0.587 

b. Now you'll have a file filename.ftf
{And YES, that file is for MK16i, but it'll work for MK16a}

c. Copy this file to C:\Flashtool\firmwares\

d. Run Flashtool -> Flashmode ->select the file

e. Deselect wipe data, wipe cache, wipe app log + exclude System, baseband, Fota, TA

f. Select No Verification

g. Click OK Image Attached

h. Follow the instruction
     wait until you see 'Ending flash session'
     INFO - Flashing finished.
     INFO - Please wait. Phone will reboot
     INFO - For flashtool, Unknown Sources and Debugging must be checked in phone                  settings
     INFO - Device connected in flash mode

REBOOT  device...


Finally you have rooted Xperia Pro with Locked Bootloader.

(Source - XDA Developers)

You can like us on Facebook or follow us on Twitter.


Sunday, November 04, 2012

Rooting Sony Xperia : S,T,P,Acro S,Ion,Tipo,Tablet S,Go,Sola,U

Sony has really being doing well with its Xperia 2012 series this year. And with ICS released for almost all Xperia phones, user are very much interested in rooting their smartphones to get the best out of it. 

             
image credit : zdnet

What's rooting? Well,  Rooting is basically becoming the 'super-user' of your android device. Unlocking functions of the device that are locked from the factory, and gaining access to the file and operating system that you cant otherwise access. It invalidates warranty. If don't follow the procedure properly you may end up with a "bricked" device that is hard or impossible to restore, It's unlikely but possible.

This rooting method will work only for Android 4.0(ICS) and above.


Tuesday, October 23, 2012

Ubuntu Ported Into Google's Nexus 7 (Video)


By Sukesh Kumar(facebook)(twitter)


Ubuntu, the most popular Linux operating system on desktop, has now been ported to Google's Nexus 7 tablet.


Nexus 7 has just reached a whole new level of awesomeness with Ubuntu in it, thanks to Canonical. Mark Shuttleworth, Ubuntu Lead, has informed people planning to attend Ubuntu Developer Summit in Copenhagen to take their Nexus 7 tablets along with them.
Victor Palau, Commercial Engineering Director of Canonical, uploaded a video which shows Nexus 7 running Ubuntu.
              

Do comment and let us know what you feel about this.

(via Redmondpie)

You can like us on Facebook and also follow us on Twitter.

Wednesday, October 17, 2012

Root Samsung Galaxy S II i9100 ( Android 4.0.3 ICS )

By Sukesh Kumar(facebook)(twitter)


DISCLAIMER : Hackinthus will not be held responsible if you lose data or your device gets damaged while following this guide. Proceed at your own risk.

Tuesday, October 16, 2012

Easiest way to root Sony Ericsson Xperia Mini Pro and other Sony Ericsson Devices.

By: Santosh Pavate (facebook) (twitter)


The following Xperia phones support this method of rooting.


  • Sony Xperia X10 (GB firmware)
  • Sony Xperia Arc
  • Sony Xperia Arc S
  • Sony Xperia Play [R800i/R800x]
  • Sony Xperia Ray
  • Sony Xperia Neo
  • Sony Xperia Neo V
  • Sony Xperia Mini
  • Sony Xperia Mini S51SE
  • Sony Xperia Mini Pro
  • Sony Xperia Pro
  • Sony Xperia Active
  • Sony Xperia Live Walkman

  • This rooting technique is developed by DooMLoRD and I give full credits to the developers. I also thank AndroidAuthority and "Xperia 2011 Easy Rooting Toolkit v4.0"


    Please follow the following instructions carefully. Hackinthus is not responsible if you brick your phone. Proceed it at your own risk.

    Requirements:


    • This root tool works only on Windows OS.
    • Make sure that you’ve installed all the drivers for your device
    • Enable USB Debugging on your device. You can do this through >Settings >Applications >Development.
    • Enable Unknown Sources on your device. You can do this through >Settings > Applications.
    • Make sure to back up all your Contacts, Messages etc as it will be lost during the rooting process. However the contents in the SD card will be safe.
    • Make sure that your device has a charge of at least 70%.
    • Download DooMLoRD’s Easy Rooting Tookit v4.0.

    Rooting Steps

    Once you have everything ready, you may now proceed to the rooting process:
    1. Download DooMLoRD’s Xperia 2011 Easy Rooting Toolkit version 4.0 from the link above.
    2. Extract its contents using WinZIP, WinRAR, or a similar archive extraction program.
    3. Connect your phone to your computer using the USB Cable.
    4. Skip the “PC Companion Software” prompt on the device.
    5. Go to the folder where you extracted the contents of DooMLoRD’s Easy Rooting Toolkit.
    6. Double-click on “RUNME.bat”
    7. It should launch a window. Simply read and follow the instructions on the screen.
    Easy isn't it?  Your Sony Ericsson Xperia is now rooted. Congratulations and enjoy your rooted device!


    Via: AndroidAuthority,  DooMLoRD
    ---------------------------------------------------------------------------------

    You can like us on Facebook and Twitter to keep yourself updated.
    Please let us know about your views by your comments.


    Friday, August 10, 2012

    AdFree Android:Blocks Ads on Your Rooted Android Phone


    AdFree Blocks Ads on Your Rooted Android Phone

    Android: AdFree is a simple, one-touch ad blocker for your rooted Android phone.

    Your phone doesn't have the horsepower that your desktop does, and excessive ads can not only bog down your system, but eat up precious bandwidth that some of us pay for by the gigabyte. If you've rooted your Android device (and most of you have), AdFree will get rid of those pesky ads for you with minimal setup.

    Just download it from the Market, open it up, and hit the "Download & Install Hosts" button at the top of the screen. There are a few options for more advanced tweaking, but most people won't have to edit any settings to get it working. Note that it actually blocks the ads from downloading; it doesn't just hide them—so it actually is conserving resources (unlike some ad blockers).

    Also note that this blocks ads in apps as well as in your browser. We wish there were a way to specify in which apps to block ads, since we want to support app developers that release their apps for free—but unfortunately there is no such option yet. As always, while we understand the need for ad blocking, consider supporting the developers and sites that you like in any way you can (i.e., if there is a donate version of an app you like, consider paying for it if you have this ad blocker turned on).

    AdFree is a free download for rooted Android phones. Note that some phones, like the HTC Droid Incredible, will require a bit of hacking to get the app working.


    Share

    Twitter Delicious Facebook Digg Stumbleupon Favorites More